This article first appeared on Oscarliang.com. Click here to view.
Hans Turpyn, a group member of Multicopter International Facebook Group showed me how he fix damaged/defective LiPo batteries by combining the good cells.
Sometimes LiPo battery might have a dead cell and it seems to be a waste to throw it away. Hans happened to have 2 LiPo batteries with the same problem so he decided to fix his by separating the LiPo cells, find out which ones are still working, and put them back together to make a working LiPo.
The Lipo batteries have to be the same brand, capacity and discharge rate for best safety and result.
Warning: LiPo batteries can be very dangerous, and I don’t recommend doing this DIY hack. This is only for my personal reference. If you ignore this warning, you are doing so at your own risk, the author and OscarLiang.com are not responsible for any damage caused.
What you need
- Multiple LiPo batteries with dead cells (with enough good cells to make a working battery, for example for a 4S LiPo you need 4 good cells)
- Multimeter to check battery/cell voltages
- Cutter
- Soldering Iron
- Hot Glue or Liquid Tape
- Electrical tape
- 80mm PVC heatshrink tube/sleeve
- A big bucket of sand to put out fires if it happens
- Han prefer to do this outdoor to avoid burning the house down
Step 1 – Remove package
Remove the plastic package off the LiPo battery, I cut it sideways because LiPo’s have a protection layer on the side to make sure i don’t cut in the cells.

Step 2 – Check cells and separate the bad ones
Separate the good cells from the bads. When taking the cells apart, it helps when you are working in a warmer room, the adhesive is a bit less sticky.
To determine if the cell is bad or not, I use a multimeter to check.


If you know the cells next to each other are good, then you don’t need to separate them just leave them stick together.
I also marked them with “OK” if they are good, in case I forget 🙂

Step 3 – Put good cells together
Check with a multimeter which terminals are the positive’s and negative’s, because I needed to put them together back to back like this: + to – to + to – to + to -to + to -.

The I soldered the cells side to side in series: + to – to + to -.

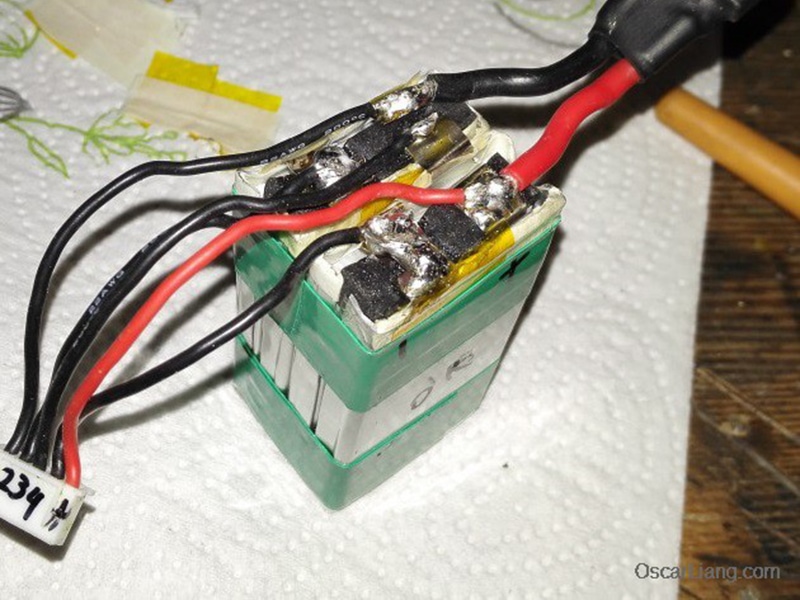
Step 4 – Soldering wires
When soldering on batteries terminals, you need to be extremely quick and use lower soldering temperature. Batteries don’t like high heat and it might cause fire if you are not careful.
Now I soldered the the main connector on the Lipo cells. (Pic 1)
- Then the balancing leads, following the wiring schematics diagram above. Starting with ground: first black balance lead connects to the ground of 4th cell. (Pic 2)
- 2nd black lead goes to – of the 3rd cell, or the + of the 4th cell (Pic 3)
- 3rd black lead to – of the 2nd cell, or the + of the 3rd cell (Pic 4)
- 4th black lead to – of the 1st cell, or the + of the 2nd cell

Lastly, the red balance lead goes to the + of the 4th cell. Then secure our solder joints with some hot glue.

Step 5 – Check and re-package
And check the voltage of the discharge connector, as well as the voltage of the balance plug, make sure each cell is reading correct voltages.

For packaging, you can use tape. I re-use the protectionlayer that i pealed off before. I recommend also getting some PVC heat shrink sleeve for even better package (80mm ones are great).
Author: Hans Turpyn