This article first appeared on Oscarliang.com. Click here to view.
Runcam has just released something pretty amazing, a brand new product – the Runcam Split HD/FPV camera. The split can be used as a FPV camera as well as for recording 1080p 60fps HD footage.
The “Split” has technically the same hardware as the discontinued Runcam 3, but it has been modified into a much more compact form factor. I have to say that the concept of the Runcam Split might be a “game changer”.
- Price: $70 or $75 with WiFi Module
- Official Product Page: http://shop.runcam.com/runcam-split/
- Pre-order (orange): http://bit.ly/runcam-split
- Black version: http://bit.ly/runcam-split-black

What’s special with the Runcam Split?
You can use the Runcam Split for FPV flying while recording 1080p60fps and totally replace your FPV camera.
The Split camera/lens is connected to a PCB board where the recording electronics and SD card reader are located. You can connect the Split directly to a VTX so it works just like a FPV camera.
The PCB board can be stacked on top of your FC/PDB, which means your HD camera is now full protected inside the quadcopter frame just like the rest of your electronics!
No more HD camera mounting on top of the frame! To mini quad that’s huge, not only it can save you over 70g, COG is also more centralized without having a GoPro sitting at the front of your copter.

It can do 1080p at 60fps and it carried on the WDR technology from Runcam 3. I would be very interested to see how the image quality would do with the smaller package, comparing to the previous Runcam 3 and Session 5.
Settings can be changed from FC (connected via UART serial port), or through WiFi on your smart phone with WiFi module. A pull request has already been submitted to Cleanflight and Betaflight to add this feature and even a tab in the configurator.

Runcam Split as a FPV Camera
Latency
We have tested the latency and we can confirm it’s nearly identical to the previous Runcam 3, and on par with the Runcam Eagle. There is no extra latency when recording 1080p 60fps.
To me, the 50ms latency was noticeable flying proximity in tight spaces and in the forrest. It’s flyable but I sometimes had to go slower to not crash. It’s not so much of a problem though when flying in the open.
| Cameras | Latency (ms) |
| Runcam Split (idle) | 51.1 |
| Runcam Split (recording) | 51.3 |
| Eagle | 45.5 |
| Runcam 3 | 50.9 |
Settings
The FPV camera settings are shared with the HD camera, which means you cannot adjust them independently. For example, if you wanted your FPV feed brighter, you would need to increase exposure in the camera, and it will make your HD footage look brighter too.
Limitation
One limitation with this idea is tight builds, where it can be difficult to fit the extra PCB on top of the flight controller (such as the Speed Addict 210, and Armattan Chameleon). Mounting pattern is another issue, where micro quads might use smaller mounting patterns such as 20mm or 16mm.
Also not all builds can provide the power/current for the camera to work, as the Split requires a 5V/650mA to operate. Assuming your FC and RX each draws 100mA, I think you will at least need a 5V/1A voltage regulator in your setup. A lot of modern PDB and FC come with onboard 5V regulators, such as the Betaflight F3 has 5V/3A which is more than enough.
With HD cameras, we can share it between different builds. But with the Split, you will need one for each build. But if the cost can come down it might make it justifiable since a FPV camera isn’t needed.
No Superview?
There is no Superview in the Split.
The reason this is not possible at the moment being the imaging sensor. To have Superview a special sensor is required, but the downside is higher latency which is bad for FPV, and incompatibility with Runcam’s WDR technology. Hopefully they can find/develop something that allows wider field of view in the future.
But the 165° FOV is still wider than the Runcam 3. The 130 degree FOV in FPV is equivalent to a 2.5mm lens.
Specifications
- FOV Angle of Field: FPV FOV 130° / Recording FOV 165°
- Video Resolution: 1080p60fps / 1080p30fps / 720p60fps
- WiFi Module Support (Removable)
- Dimensions: PCB 36*38mm (30mm mounting pattern) / Lens Module 22*20mm
- Power – Voltage/Current: 5V / 430mA when idle, 540mA-650mA when recording
- Weight: 21g
- Supports WiFi configuration (wifi module is provided and removable)
- Integrated Microphone (can be used for FPV)
Ribbon Cable (between lens and main board): 26-pin 0.5mm pitch. You can get longer extension cable, but Runcam doesn’t recommend any longer cables than the ones provided as it would be more susceptible to interference and signal attenuation.
It comes with these items in the box:

The Split Lens is the same width and height as the Swift Mini, smaller in length.

Here are the mounting solutions:


Close look at the main board:


SD Card Slot
Unlike the previous Runcam’s “push ejection” SD card slot, where you can eject the SD card by pushing the it down. To prevent accidental card ejection, they have replace it with a “top openning” design slot, where the card won’t pop out so easily during flight or in a crash. This means that when it’s installed into your FC stack you better:
- make sure you fitted the microsd card before installing the split PCB
- hope you never need to take that SD card out!
We will see how well this perform in our tests. Perhaps I would put a piece of tape to further secure it. We can read the card using the Micro USB cable anyway so there is no need to take the card out.

Wifi Module and Android/iOS App
The Wifi Module costs an extra $5. It allows you to connect the camera to your smart phone and have access to all the settings etc. It’s not necessary as you can also change most of the settings through the OSD menu in FPV mode.

The good news is they are trying to work with Cleanflight and Betaflight to get the Split supported, so hopefully in the feature we can change the settings in the CF/BF configurator tab 🙂
The operation and settings are nearly identical to the Runcam3. Default password is 0123456789.

Installation and Testing Rig
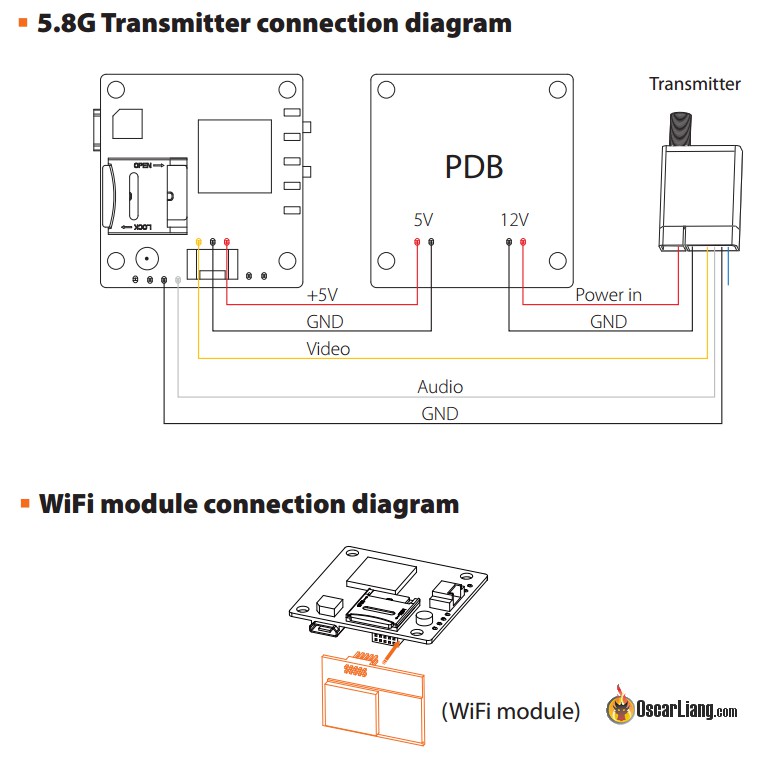
Buttons, LED’s, and connections on the PCB.

Connection between VTX, PDB and wifi module. The Split takes 650mA current when recording (tested), and you definitely want to make sure your 5V supply is up for the job.
This is the quad I am using for the testing.

Parts:
- Quadrant BLHeli32 ESC’s
- XRacer F303 FC (I prefer Betaflight F3)
- DYS Fire 2600KV motors
- DAL 5040×3 Props
Originally, I have a Demon Core PDB which is a known and solid PDB, the 5V is rated for 600mA. I thought I could be lazy and shared that 5V between the Split and FC/RX. BIG MISTAKE!
The FC went into random shutdown during the flight probably because it didn’t get enough current. So in the end I had to add a dedicated 5V regulator for the Split. Using this regulator gives me perfect FPV video feed, no noise at all even at rapid throttle changes. But if your FC or PDB can supply enough current for your gear that should be fine without additional regulators.

Performance Testing
Mounted the Split in my mini quad, cannot believe how compact this is. My quad can now record 1080p60fps footage and yet it only weighs at 330g. Over 80g lighter than when using a Session with a 3D printed mount.

Day time flight test
Low light flight test
Image Quality
As confirmed by Runcam, The Split and Runcam 3 are technically the same camera (same hardware), we would expect the same image quality from both cameras. And we are correct, from our tests they do look nearly identical, the colour, the sharpness, and the dynamic range.
Bit rate is also the same as the RC3, at 30Mbps at the best setting.


However, the Split shows a wider FOV due to a different lens. That’s one step closer to having “Superview” 🙂
FPV feed also performed acceptable during the day. The image doesn’t look as good as other dedicated FPV cameras IMO, but good enough for everyday flying. The aspect ratio 4:3 is achieved by chopping the left and right sides off, and a tiny bit on the top and bottom.


Props in view
Firstly, because the camera is mounted vertically lower compared to traditional HD cameras, the propellers are more likely to appear in the shot. Although you might not see it in your FPV feed, but due to the wider FOV in HD recording it might appear when you check the HD footage later on.
Secondly, the Split has wider FOV than the Runcam 3, making it more likely to see spinning props in the frame.
I suppose this might be more of a problem for true-X frames than long body frames like the ZMR or Alien.
I tried a different lens and it actually helped getting rid of the frame and props in the view, see detail here.
Jello
Unlike traditional HD cameras which are usually mounted with vibration damping material such as TPU mounts, image are normally pretty stable even with acceptable amount of oscillations from the quad. But because the Runcam Split camera is hard mounted in the frame, your quad has to be tuned well to prevent jello and vibrations. One solution is to “soft mount” the camera somehow.
I personally haven’t seen much jello in my footage. Runcam has confirmed they might release some sort of TPU mounts in the near future.
Conclusion – Is the Split for you?
The Split isn’t for everyone.
At the time of testing the Split, I was also testing the Eagle 2. If I don’t have to record HD, I would prefer using the Eagle 2 because of the better WDR and lower latency. So I probably wouldn’t use it for racing.
However it’s pretty amazing that it makes a lighter and more compact builds that allows 1080p HD recording. My quad flies so much better and longer without the additional weight of a HD camera.
Although the HD footage playback looks pretty good in low light, it was way too dark to fly in FPV. Perhaps you could increase exposure but it will make your HD footage noisier, so I wouldn’t recommend using this for low light flying.
FAQ (Must Read Before Using)
Getting pink/purple flashes in the video/FPV feed?
A: This is caused by a bad/loose module connection. Remove the cable that connects the lens and the main board, and reinsert it carefully.

What happens when the camera loses power during recording?
A: The video is saved automatically when power is lost, but you will lose a few seconds at the end. It’s still better than having the whole file lost or corrupted. This is useful say when you have a crash and the battery gets disconnected, and you wouldn’t miss too much of the epic action.
Can I use 16:9 for FPV?
The Split uses 4:3 aspect ratio for FPV by default, and you can change it to 16:9 in the settings, by turning off “Full Screen”. However we don’t recommend using 16:9 with the Split.
It has a feature called “auto adaptation”, which won’t stretch or compress your image even if the screen doesn’t match the image. For example on my 4:3 screen, the 16:9 image leaves 2 black bars on top and bottom rather than compressing it like we normally see on other 16:9 cameras. But if you display 16:9 image in a 16:9 screen, you will get a black frame around the image, making the image smaller than it should.


NTSC and PAL
PAL/NTSC encoding for FPV video can be changed in the settings.

Why settings are not saved?
Once you have changed settings, you MUST manually switch off the camera by holding down the power button in order to save it. If you just unplug power without turning the camera off first, settings will be lost.
Flash/Update Firmware
Same procedure on other Runcam HD cameras:
- Write down your camera settings, as firmware flashing will reset all your settings
- Download the latest firmware file (xxx.BRN)
- Place the file on the top directory of your SD card
- Insert SD card in the camera, and power it on
- The camera LED should start flashing for a minute or 2, and turns off upon completion
Does the Split take GoPro lenses?
The answer is yes, it’s actually compatible with lenses from Swift/Eagle lenses. I have a spare “GoPro” Lens for the Runcam Swift, so I decided to give it a try on the Split. It’s actually the same lens used on the Swift Rotor Riot Edition.
This lens is labelled as RC25G, and it’s available on
- Runcam: http://bit.ly/2rV5vlq
- Amazon (US): http://amzn.to/2tsWVfZ

I really like the new lens, it gives better and more neutral colour IMO, the stock lens always looks a bit green-ish. FOV seems to be the same in both HD and FPV.
More importantly, because it’s longer, it reaches out further and minimizes the chance of getting frame and props in the view. In my case obstacles are nearly gone in the footage.
(The lens is probably not perfectly focus as I just put it on with the help of my FPV goggles.)

Warning: 5V reverse current protection
Thanks to Dominic Clifton, he found a issue with the lack of reverse current protection on the Split, and here his suggestion when using the camera.
There problems are
- when you connect the USB cable you will get 5V on the 5V pin on the 5V/GND/VIDEO 3 pin picoblade connector. This 5V will then run along the cable to your BEC, which if it doesn’t have protection it may fry it
- If you have the runcam powered by the 5V input then you will also be sending 5V from your BEC to your computer! i.e. the Quad you installed the Split in will send power to your computer. Back-feeding your USB socket with 5V can damage your USB socket and/or computer
Here is what you can do as an user
- use a diode between the 5V OUTPUT from your BEC to your RunCam SPLIT 5V INPUT. 5V BEC OUTPUT —[ >| ]— 5V RunCam SPLIT INPUT
- Always remember to disconnect the 3 pin picoblade connector from the runcam split BEFORE inserting a USB cable
- NEVER to use the USB socket on the Split when the Split is powered by the BEC/PDB/FC.
Here is what Runcam should do in the next revision: use two diodes in their next design or otherwise disable the USB from supplying power to the 5V INPUT *and* disable the 5V INPUT from supplying power to the USB.
FPV Feed is dropping frames and “laggy”?
If you found your Split has low frame rate lag on the analog live video, no matter whether you set it to 60fps, 30fps, PAL or NTSC, there is a resolution.
As it turns out, turning on the date/time stamp, causes the frame lag (frame drop) on the live out video. So disabling date/time stamp should fix it.